Write One, Run AnyWhere
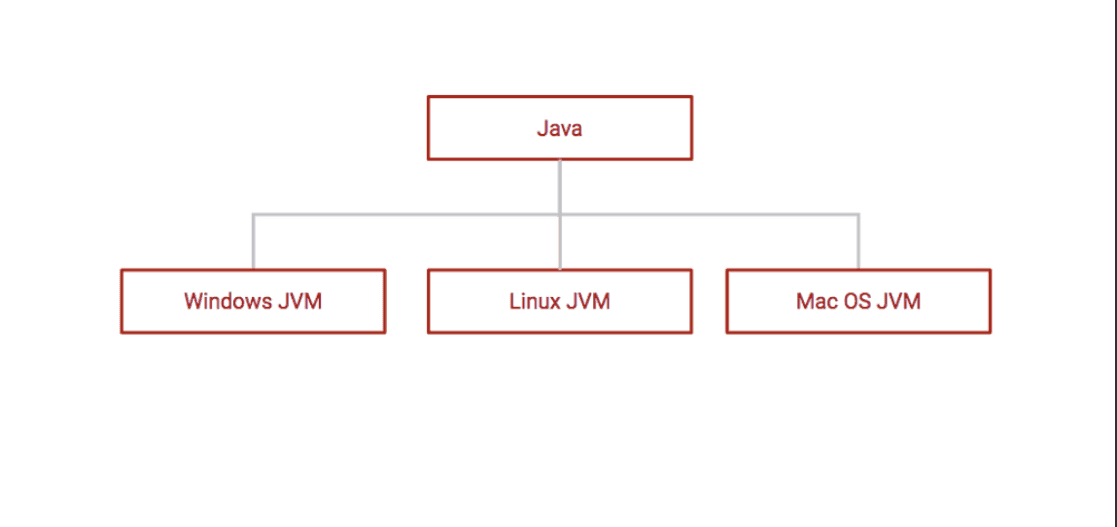
你可以在windows上写Java代码,并且在Linux或Mac等平台运行相同的代码。这归功于JVM(Java Virtual Machine)在不同平台上的实现。JVM通过字节码(Java源码编译的中间机器码)在不同的平台上解释和执行。
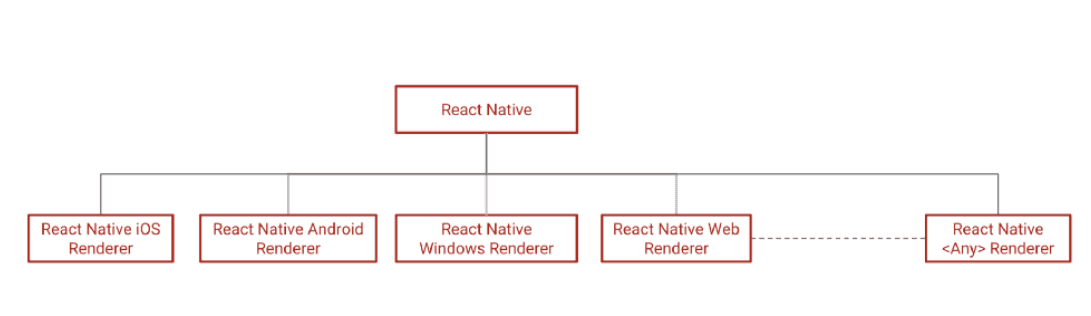
同理,如果你有特定平台的React Native 渲染器,你可以在不同平台运行同样的react native app。一个React Native 渲染器会把React Native Component转化到特定平台的Native UI。
每个UI平台都有一些基础的UI 元素,比如:
- View 或者 Container 或者 ViewGroup用来组成/布局子元素UI
- Text元素去渲染文字
- Image元素去渲染图片
- ScrollView元素去滑动元素
- 和其他
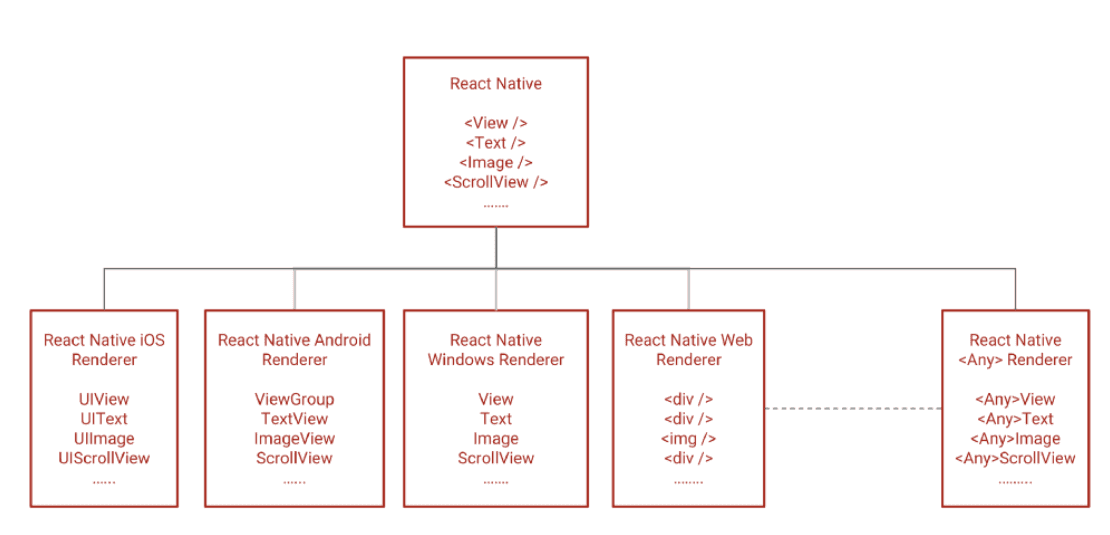
每一个平台有不同的方式去布局,不同的方式去展示文字,不同的方式去这展示图片,但是所有平台都或多或少地提供相同的功能。
唯一的不同是这些平台的API。
如果这些都抽象成统一的API怎么样?
你可以认为这就是React Native所做的。
React Native定义了一系列平台无关的组件API,所以只要特定平台的组件提供了这些组件的实现,那么App将可以运行在这个平台。
官方的React Native项目是iOS和Android的渲染器,但是还有很多社区开源项目提供了Web,Windows,MacOS,Ubuntu等React Native渲染器。
作为一个App开发者,一定想要竟可能做更少努力让App能够运行在尽可能多的平台,复用相同的代码并且不损耗性能。React Native正好符合这个要求。不像Cordova或Ionic等web/hybrid框架,它不是在webview里运行App,react native组件会映射成系统提供的真实原生UI组件。
让我们看下一个简单的react native渲染器实现。我们将创建两个不同的渲染器,一个是Web环境运行,另一个是使用Yue在桌面运行。Yue一个用来创建原生跨平台GUI app的库。前几步和hello-react-custom-renderer很相似。
-
使用 create-react-app创建一个新的react项目并且启动
create-react-app hello-react-native-custom-renderer
cd hello-react-native-custom-renderer
yarn start
在
index.js文件里,用我们自己的react native渲染器替换ReactDomRenderer。import React from 'react'; import MyReactNativeWebRenderer from './myReactNativeWebRenderer'; import App from './App'; MyReactNativeWebRenderer.render(<App />, document.getElementById('root')); -
如下修改
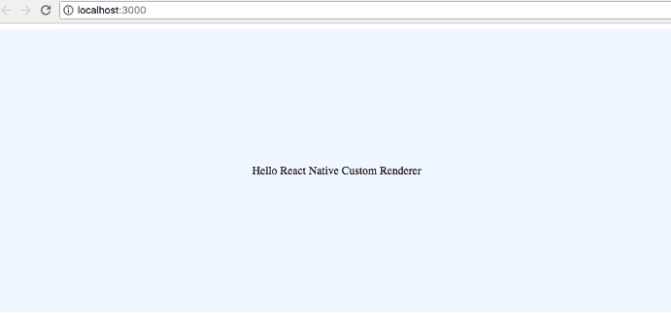
App.jsimport React, { Component } from 'react'; import View from './view'; import Text from './text'; class App extends Component { render() { return ( <View style={{ flex: 1, justifyContent: 'center', alignItems: 'center', backgroundColor: '#8BBDD9', height: 400 }} > <Text>Hello React Native Custom Renderer</Text> </View> ); } } export default App;相比hello-react-custom-renderer我们简化一下UI。尝试实现简单的渲染器,包含一个View和一个居中的Text组件。
View: 在React Native文档中提到,“作为创建 UI 时最基础的组件,View 是一个支持 Flexbox 布局、样式、一些触摸处理、和一些无障碍功能的容器,并且它可以放到其它的视图里,也可以有任意多个任意类型的子视图。不论在什么平台上,View 都会直接对应一个平台的原生视图,无论它是 UIView、div 还是 android.view.View。”
Text:“一个用来展示文字的React组件。”
-
添加react-reconciler包到项目内,
yarn add react-reconciler -
创建一个新文件
myReactNativeWebRenderer.js并且从我们的react custom renderer里复制渲染器的源码。import ReactReconciler from 'react-reconciler'; function traceWrap(hostConfig) { let traceWrappedHostConfig = {}; Object.keys(hostConfig).map(key => { const func = hostConfig[key]; traceWrappedHostConfig[key] = (...args) => { console.trace(key); return func(...args); }; }); return traceWrappedHostConfig; } const rootHostContext = {}; const childHostContext = {}; const hostConfig = { now: Date.now, getRootHostContext: () => { return rootHostContext; }, prepareForCommit: () => {}, resetAfterCommit: () => {}, getChildHostContext: () => { return childHostContext; }, shouldSetTextContent: (type, props) => { return typeof props.children === 'string' || typeof props.children === 'number'; }, /** This is where react-reconciler wants to create an instance of UI element in terms of the target. Since our target here is the DOM, we will create document.createElement and type is the argument that contains the type string like div or img or h1 etc. The initial values of domElement attributes can be set in this function from the newProps argument */ createInstance: (type, newProps, rootContainerInstance, _currentHostContext, workInProgress) => { const domElement = document.createElement(type); Object.keys(newProps).forEach(propName => { const propValue = newProps[propName]; if (propName === 'children') { if (typeof propValue === 'string' || typeof propValue === 'number') { domElement.textContent = propValue; } } else if (propName === 'onClick') { domElement.addEventListener('click', propValue); } else if (propName === 'className') { domElement.setAttribute('class', propValue); } else { const propValue = newProps[propName]; domElement.setAttribute(propName, propValue); } }); return domElement; }, createTextInstance: text => { return document.createTextNode(text); }, appendInitialChild: (parent, child) => { parent.appendChild(child); }, appendChild(parent, child) { parent.appendChild(child); }, finalizeInitialChildren: (domElement, type, props) => {}, supportsMutation: true, appendChildToContainer: (parent, child) => { parent.appendChild(child); }, prepareUpdate(domElement, oldProps, newProps) { return true; }, commitUpdate(domElement, updatePayload, type, oldProps, newProps) { Object.keys(newProps).forEach(propName => { const propValue = newProps[propName]; if (propName === 'children') { if (typeof propValue === 'string' || typeof propValue === 'number') { domElement.textContent = propValue; } } else { const propValue = newProps[propName]; domElement.setAttribute(propName, propValue); } }); }, commitTextUpdate(textInstance, oldText, newText) { textInstance.text = newText; }, removeChild(parentInstance, child) { parentInstance.removeChild(child); } }; const ReactReconcilerInst = ReactReconciler(traceWrap(hostConfig)); export default { render: (reactElement, domElement, callback) => { // Create a root Container if it doesnt exist if (!domElement._rootContainer) { domElement._rootContainer = ReactReconcilerInst.createContainer(domElement, false); } // update the root Container return ReactReconcilerInst.updateContainer(reactElement, domElement._rootContainer, null, callback); } }; -
为了我们的
App.js里的测试用例,我们要修改上面的渲染器。需要创建两个组件比如View和Text,映射到对应的目标组件。tips:”以小写字母开头的元素代表一个 HTML 内置组件,比如
<div>或者<span>会生成相应的字符串'div'或者'span'传递给React.createElement(作为参数)。大写字母开头的元素则对应着在 JavaScript 引入或自定义的组件,如<Foo />会编译为React.createElement(Foo)。“可以在这个文档里了解更多:https://reactjs.org/docs/jsx-in-depth.html#user-defined-components-must-be-capitalized我们创建
View和Text作为小写view和text的简单包装。View: 实现View的复杂点是flexbox布局。但是既然我们的目标是web,这里已经有一个flexbox的实现了。
import React, { Component } from 'react'; class View extends Component { render() { return ( <view style={{ display: 'flex', flexDirection: 'column', ...this.props.style }} > {this.props.children} </view> ); } } export default View;View组件默认的flex布局方式是cloumn.Text: 像默认的React Native渲染器,我们将只在独立的
Text组件里渲染文字。在web上我们不需要一个特定的UI元素去渲染文字,但是我们将强制像react-native一样,只使用Text组件去渲染字符串,以便和标准的react-native行为一致。class Text extends Component { render() { return <text>{this.props.children}</text> } } -
让我们看看hostConfig对应的变化
shouldSetTextContent: (type, props) => {
  return false;
},
这里return false是因为想只让Text组件渲染字符串。这会让react-reconciler调用createTextInstance
createTextInstance: (text, rootContainerInstance, hostContext, internalInstanceHandle) => {
  return document.createTextNode(text);
},
如果在
createInstance函数,一个非Text组件使用了文字作为子元素,我们将抛出一个错误。createInstance: (type, newProps, rootContainerInstance, _currentHostContext, workInProgress) => { const domElement = document.createElement('div'); Object.keys(newProps).forEach(propName => { const propValue = newProps[propName]; if (propName === 'children') { if (type !== 'text') { if (typeof propValue === 'string' || typeof propValue === 'number') { throw new Error('Text strings must be rendered within a <Text> component.'); } if (propValue instanceof Array) { propValue.forEach(item => { if (typeof item === 'string') { throw new Error('Text strings must be rendered within a <Text> component.'); } }); } } } else if (propName === 'style') { const styleString = convertCamelCasetoInlineStyle(propValue); domElement.setAttribute('style', styleString); } else { const propValue = newProps[propName]; domElement.setAttribute(propName, propValue); } }); return domElement; },这里另一个需要注意的是,为了demo保持简单,我们把驼峰样式对象转成了内联样式。在ReactNative里,常见的方式是使用StyleSheet API
然后,完整的
myReactNativeWebRenderer.js如下:import ReactReconciler from 'react-reconciler'; function traceWrap(hostConfig) { let traceWrappedHostConfig = {}; Object.keys(hostConfig).map(key => { const func = hostConfig[key]; traceWrappedHostConfig[key] = (...args) => { console.trace(key); return func(...args); }; }); return traceWrappedHostConfig; } function camel2Dash(str) { if (str === '') { return ''; } str = str[0].toLowerCase() + str.substr(1); return str.replace(/([A-Z])/g, function($1) { return '-' + $1.toLowerCase(); }); } function convertCamelCasetoInlineStyle(style) { const transformedStyles = {}; if (style) { Object.keys(style).forEach(key => { const dashedKey = camel2Dash(key); transformedStyles[dashedKey] = style[key]; if (key === 'height') { transformedStyles[dashedKey] = style[key] + 'px'; } }); } const styleString = Object.keys(transformedStyles).map(key => { return `${key}:${transformedStyles[key]};`; }); return styleString.join(''); } const rootHostContext = {}; const childHostContext = {}; const hostConfig = { now: Date.now, getRootHostContext: () => { return rootHostContext; }, prepareForCommit: () => {}, resetAfterCommit: () => {}, getChildHostContext: () => { return childHostContext; }, shouldSetTextContent: (type, props) => { return false; }, /** This is where react-reconciler wants to create an instance of UI element in terms of the target. Since our target here is the DOM, we will create document.createElement and type is the argument that contains the type string like div or img or h1 etc. The initial values of domElement attributes can be set in this function from the newProps argument */ createInstance: (type, newProps, rootContainerInstance, _currentHostContext, workInProgress) => { const domElement = document.createElement('div'); Object.keys(newProps).forEach(propName => { const propValue = newProps[propName]; if (propName === 'children') { if (type !== 'text') { if (typeof propValue === 'string' || typeof propValue === 'number') { throw new Error('Text strings must be rendered within a <Text> component.'); } if (propValue instanceof Array) { propValue.forEach(item => { if (typeof item === 'string') { throw new Error('Text strings must be rendered within a <Text> component.'); } }); } } } else if (propName === 'style') { const styleString = convertCamelCasetoInlineStyle(propValue); domElement.setAttribute('style', styleString); } else { const propValue = newProps[propName]; domElement.setAttribute(propName, propValue); } }); return domElement; }, createTextInstance: (text, rootContainerInstance, hostContext, internalInstanceHandle) => { return document.createTextNode(text); }, appendInitialChild: (parent, child) => { parent.appendChild(child); }, appendChild(parent, child) { parent.appendChild(child); }, finalizeInitialChildren: (domElement, type, props) => {}, supportsMutation: true, appendChildToContainer: (parent, child) => { parent.appendChild(child); }, prepareUpdate(domElement, oldProps, newProps) { return true; }, commitUpdate(domElement, updatePayload, type, oldProps, newProps) {}, commitTextUpdate(textInstance, oldText, newText) {}, removeChild(parentInstance, child) {} }; const ReactReconcilerInst = ReactReconciler(traceWrap(hostConfig)); export default { render: (reactElement, domElement, callback) => { // Create a root Container if it doesnt exist if (!domElement._rootContainer) { domElement._rootContainer = ReactReconcilerInst.createContainer(domElement, false); } // update the root Container return ReactReconcilerInst.updateContainer(reactElement, domElement._rootContainer, null, callback); } };现在,我们的页面应该像这样:
-
我们再构建一个桌面UI react native渲染器。测试用例和
App.js一样。渲染结果是使用Yue GUI库。添加Yue库,npm包的名字是guiyard add gui -
创建一个新文件
myReactNativeYueRenderer.js并且从myReactNativeWebRenderer.js复制代码出来。 -
添加新的文件
yue-index.js,babel.rc和其他一些有帮助的npm脚本。yue-index.js
import React from 'react';
import MyReactNativeYueRenderer from './myReactNativeYueRenderer';
import App from './App';
import gui from 'gui';
const win = gui.Window.create({});
win.setContentSize({ width: 400, height: 400 });
win.center();
win.activate();
MyReactNativeYueRenderer.render(<App />, win);
if (!process.versions.yode) {
  gui.MessageLoop.run();
  process.exit(0);
}
和
index.js有点不同,我们要构建Yuegui 和事件循环。想了解更多可以看 Yue docs。yarn add babel-cli babel-plugin-transform-object-spread babel-preset-env babel-preset-react -D.babelrc
{
  "presets": ["env", "react"],
  "plugins": ["transform-object-rest-spread"]
}
package.json
"scripts": {
  "start": "react-scripts start",
  "start-yue": "./node_modules/.bin/babel-node --presets react ./src/yue-index.js",
.....
}
现在应该可以启动app了(但是会没有效果)
yarn start-yue -
完整的
myReactNativeYueRenderer.js代码如下:import ReactReconciler from 'react-reconciler'; import gui from 'gui'; function traceWrap(hostConfig) { let traceWrappedHostConfig = {}; Object.keys(hostConfig).map(key => { const func = hostConfig[key]; traceWrappedHostConfig[key] = (...args) => { console.trace(key); return func(...args); }; }); return traceWrappedHostConfig; } function camel2Dash(str) { if (str === '') { return ''; } str = str[0].toLowerCase() + str.substr(1); return str.replace(/([A-Z])/g, function($1) { return '-' + $1.toLowerCase(); }); } function convertCamelCasetoInlineStyle(style) { const transformedStyles = {}; if (style) { Object.keys(style).forEach(key => { const dashedKey = camel2Dash(key); transformedStyles[dashedKey] = style[key]; if (key === 'height') { transformedStyles[dashedKey] = style[key] + 'px'; } }); } const styleString = Object.keys(transformedStyles).map(key => { return `${key}:${transformedStyles[key]};`; }); return styleString.join(''); } const rootHostContext = {}; const childHostContext = {}; const hostConfig = { now: Date.now, getRootHostContext: () => { return rootHostContext; }, prepareForCommit: () => {}, resetAfterCommit: () => {}, getChildHostContext: () => { return childHostContext; }, shouldSetTextContent: (type, props) => { return false; }, createInstance: (type, newProps, rootContainerInstance, _currentHostContext, workInProgress) => { const yueElement = gui.Container.create(); Object.keys(newProps).forEach(propName => { const propValue = newProps[propName]; if (propName === 'children') { if (type !== 'text') { if (typeof propValue === 'string' || typeof propValue === 'number') { throw new Error('Text strings must be rendered within a <Text> component.'); } if (propValue instanceof Array) { propValue.forEach(item => { if (typeof item === 'string') { throw new Error('Text strings must be rendered within a <Text> component.'); } }); } } } else if (propName === 'style') { yueElement.setStyle(propValue); } }); return yueElement; }, createTextInstance: (text, rootContainerInstance, hostContext, internalInstanceHandle) => { return gui.Label.create(text); }, appendInitialChild: (parent, child) => { parent.addChildView(child); }, appendChild(parent, child) { parent.addChildView(child); }, finalizeInitialChildren: (yueElement, type, props) => {}, supportsMutation: true, appendChildToContainer: (parent, child) => { parent.setContentView(child); }, prepareUpdate(yueElement, oldProps, newProps) { return true; }, commitUpdate(yueElement, updatePayload, type, oldProps, newProps) {}, commitTextUpdate(textInstance, oldText, newText) {}, removeChild(parentInstance, child) {} }; const ReactReconcilerInst = ReactReconciler(traceWrap(hostConfig)); export default { render: (reactElement, guiWindow, callback) => { // Create a root Container if it doesnt exist if (!guiWindow._rootContainer) { guiWindow._rootContainer = ReactReconcilerInst.createContainer(guiWindow, false); } // update the root Container return ReactReconcilerInst.updateContainer(reactElement, guiWindow._rootContainer, null, callback); } };和
myReactNativeWebRenderer.js非常像,但是我们使用的是YueApi 都不是DOM Api。gui.Container.create()而不是document.createElement('div')gui.Text.create(text)而不是document.createTextNode(text)Yue gui库有一个flexbox布局实现库yoga-layout. 我们甚至不需要像web渲染器一样转换成内联样式。我们只需要使用方便的setStyle method
.......
} else if (propName === 'style') {
  yueElement.setStyle(propValue);
}
......
借助react native渲染器,我们用同样的程序代码运行在两个不同的目标平台
web和Yue GUI。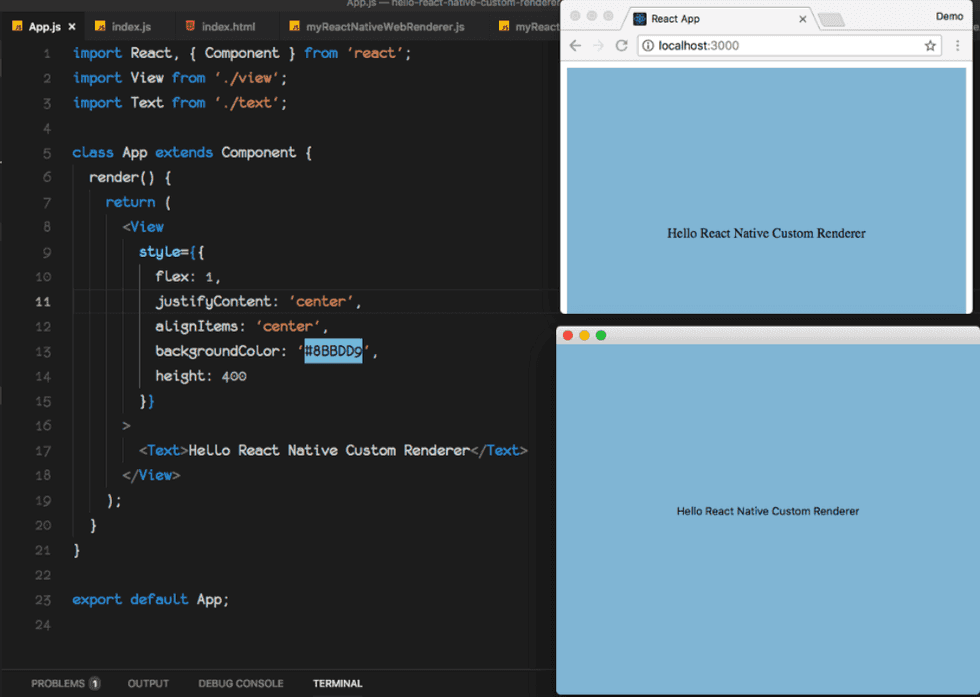

这篇文章的代码在: https://github.com/agenthunt/hello-react-native-custom-renderer
本文首发于 一粟(https://www.zeyio.com),欢迎转载,但是必须保留本文的署名和链接。